

How Large Should The Heat Duct Register Be On 8 Flex Duct
All photos: courtesy U.S. Dept. of Energy
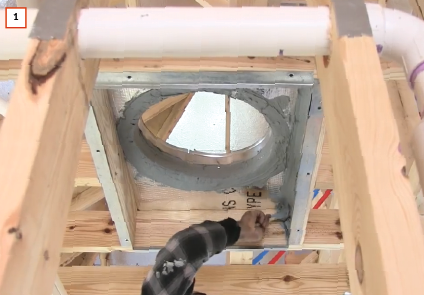
On most projects, HVAC flexible ductwork is located in designated chases that maximize the efficiency of the airflow. Simply the path for the final branch of the flexible ductwork tree—the one that runs from the trunk or plenum to the outlet register—is typically called past the subcontractor. Often, they find themselves competing to notice space to run the ducts among all the wiring and pipage already installed by the electrical and plumbing trades.
Flexible ducts can speed installation by reducing the number of joints in a run and eliminating the need for elbows and offsets. They also easily conform to oval equally well as round connectors. But the concrete properties of flexible ducts that create advantages are likewise the source of potential bug if intendance isn't taken during installation. A expert first step, or course, is to make sure there is effective communication among all the parties involved, including designers, framers, and HVAC, plumbing, and electric tradespeople when installing flexible ducts.
But it doesn't injure to have visual aids when discussing, monitoring, or inspecting the piece of work. The details presented here were captured from the U.S. Section of Free energy's Building America videos and cover the fundamentals of flexible duct design and installation. A lot of what you'll find here is common sense, but don't let that fool you. Airflow is more complicated than it seems, and carelessness or disregard for these best practices can really come up back to bite yous.
1. Seal the Ducts With Mastic
All ducts should be sealed using UL-181–rated duct mastic [1], and flexible ducts should be held in identify with tie wraps at all connectors. Ideally, all ducts should be located within the conditioned space. This is typically the case for ducts that run through a dropped ceiling or soffit, or between joists, so long as the flooring system sits on elevation of a conditioned basement or crawlspace. Attics can be problematic when insulation is located in the attic floor rather than in the rafter trophy or, better yet, exterior the roof sheathing.
When flexible ducts are located outside the conditioned space, they should be sealed to prevent loss of conditioned air and also insulated to forbid thermal loss or proceeds from the ambient air.
All ducts, whether rigid or flexible, should be sealed with UL-181–rated duct mastic. Duct tape has many uses, but sealing ducts isn't one of them.
Analogy: Air Diffusion Quango, "Flexible Duct Performance & Installation Standards," 5th Edition
RELATED: The Body's Defenses Against Breathing Dusty Air
2. Use Only What You Demand
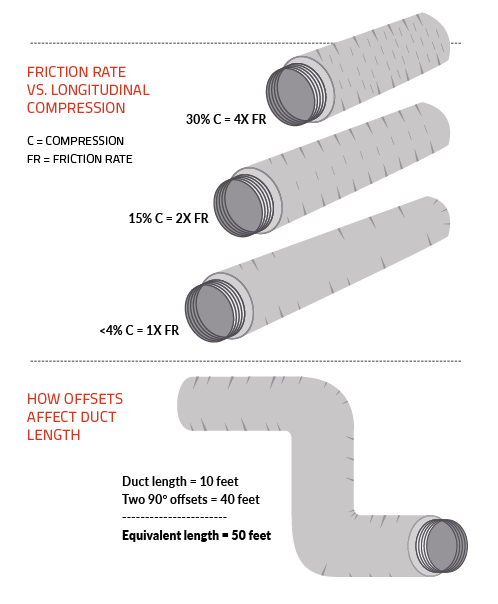
Friction is the enemy of airflow. Unlike rigid ducts, which are cut to length within a tolerance of i inch or less, it'south easy to cutting a length of flexible duct that'southward several feet longer than is needed to get from point A to point B [2A]. That creates slack in the duct, which reduces airflow for ii reasons. Beginning, because the air has to travel farther, it is exposed to more of the duct's interior surface surface area. Second, considering the duct isn't stretched tight, the wire ribs in the duct create more friction than usual along the entire length of duct.
To maintain strong airflow, programme for short, directly runs during the pattern stage. Pay particular attention to the framing plan, and route ducts through floor trusses where possible [2B]. Monitor the plan during framing and exist prepared to create chases to carry ducts where necessary. Likewise make certain that all ducts, regardless of length, are stretched tight between fittings.
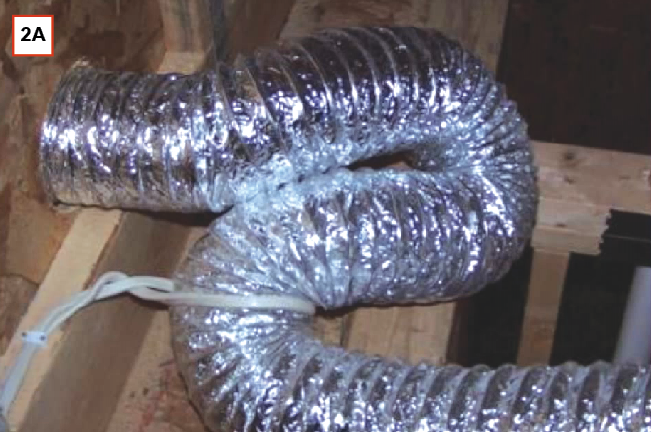
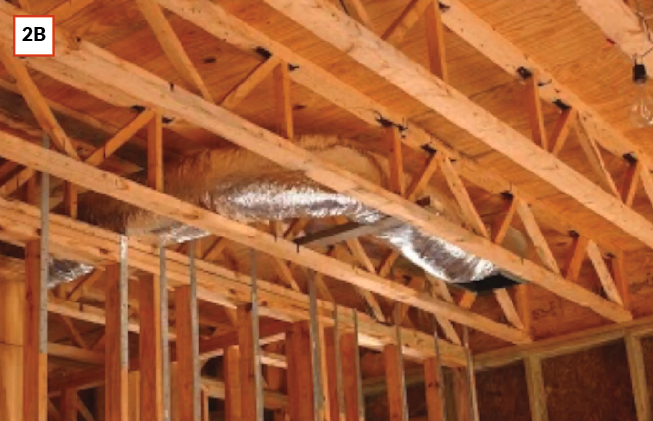
Avoid taking up slack with sharp bends [2A], which severely reduce airflow. Program the framing package to include chases or trusses to adapt ductwork [2B]. Ducts that are not stretched tight or that contain sharp bends tin can increase the equivalent length of the duct run by several multiples (see analogy, above).
iii. Don't Get Kinky With Your Flexible Ductwork
Airflow in a duct run of any length can exist compromised by precipitous turns or even kinks. And each turn, kink, or compression in a duct run reduces airflow, which results in more comfort-related complaints from your customers.
Unfortunately, on many jobsites, poor planning of the framing and lack of coordination amid subtrades issue in all manner of bends and kinks, some of which all but finish airflow completely [3A].
Once the drywall is upward, these bug are impossible to locate, then carefully audit flexible ductwork earlier the drywall crew begins its work. Kinks are insufficiently like shooting fish in a barrel to spot, but a abrupt bend can constrict airflow and is more difficult to see [3B]. Where bends tin can't be avoided, make sure that the radius of any plow is at least the same dimension as the duct bore. For instance, the center line of a bend in 8-inch–diameter duct should follow a curve with a radius of at least 8 inches [3C]. One easy way to ensure that bends meet this standard is to use metallic elbows at these disquisitional locations.
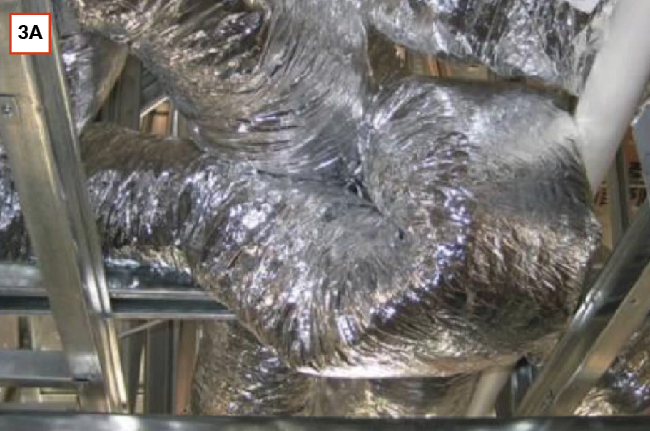
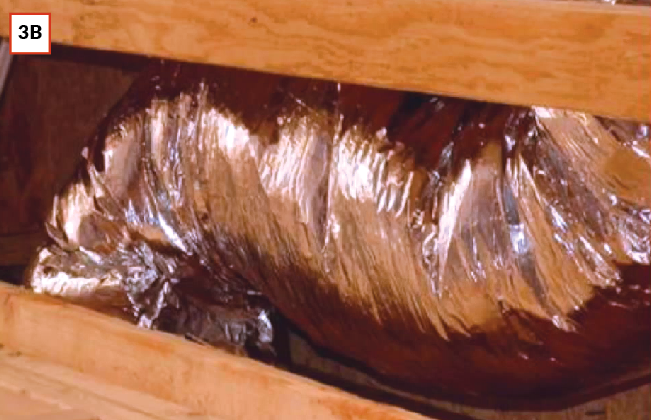
Lack of coordination amongst subtrades can event in bends and kinks to avert piping, wiring, and framing components [3A]. To prevent the need for costly troubleshooting backside finished walls and ceilings, carefully inspect before drywall is installed to make sure there are no sharp bends or any kinks concealed behind framing [3B].

Analogy: courtesy U.S. Dept. of Energy
RELATED: Fresh Air: Rules for Skilful Indoor Air Quality
4. Support the Ducts
Sometimes the all-time route for a flexible duct run is up and over an obstacle. But without proper support, ducts can develops sags or kinks that reduce airflow [4A, 4B].
To prevent problems, employ saddles or straps to support at regular intervals [4C, 4D]. Follow the manufacturer'due south instructions, but in case they "get lost," here is a listing of best practices for supporting ducts:
- Infinite supports no more than than iv feet apart (a connexion to a rigid duct or to equipment counts as a back up indicate).
- Supports should be at to the lowest degree 1½ inches broad.
- In long horizontal runs with precipitous bends, employ extra supports earlier and after the bends.
- Don't let the ducts sag more than than ½ inch per pes betwixt supports; maximum sag shouldn't exceed 2½ inches [4E].
- Support straps should not compress the inner cadre or constrict airflow.
- Supports should not tuck the insulation because that can cause cold spots and condensation, which can atomic number 82 to mold growth.
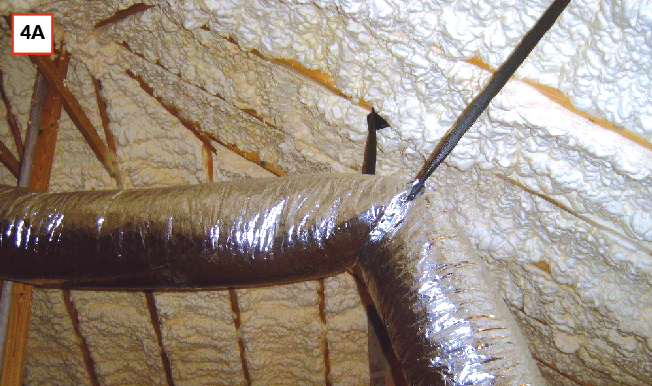

When ducts must exist routed up and over an obstruction, too few supports can cause kinks [4A]. The solution is to create a gradual bend using supports at frequent intervals [4B]. Supporting cloth should be wide enough to avoid compressing the duct.
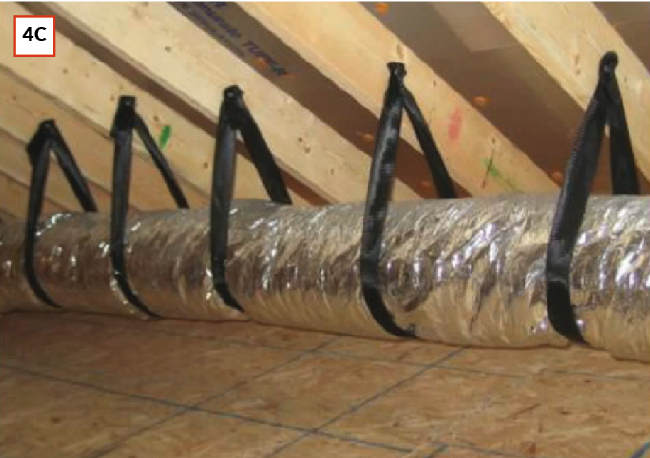
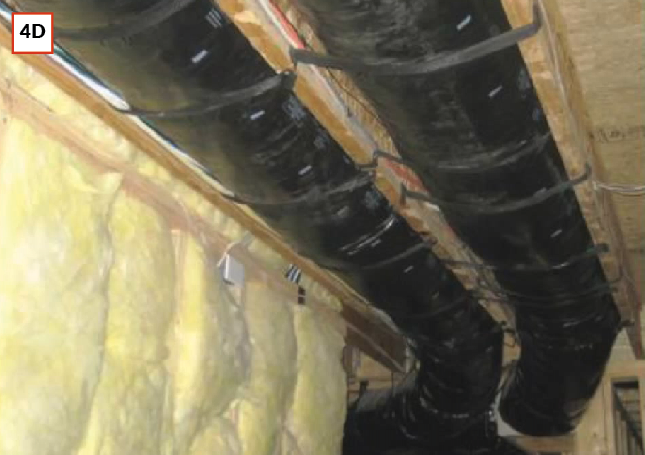
A good rule of thumb is to provide a duct support no less than every 4 anxiety, and more than frequently when using large-diameter flexible duct [4C], fifty-fifty when ducts are partially supported by framing members [4D]. Ideally, ducts shouldn't sag more than ½ inch per foot betwixt supports, and maximum sag should non exceed
2½ inches [4E].
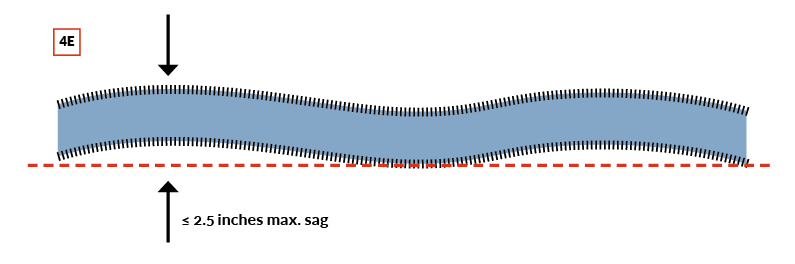
Illustration: courtesy U.S. Dept. of Energy
---
This article was adapted from a video series at ProTradeCraft.com, which is based on material from the Building America Solution Center (BASC), an online tool from the U.Southward. Department of Energy that collects all-time-practices recommendations from the land's top building science and home building experts.
RELATED: Healthy Home Sanctuary

How Large Should The Heat Duct Register Be On 8 Flex Duct,
Source: https://www.proremodeler.com/4-rules-flexible-ducts-remodelers-need-know
Posted by: hultgrenevessureary.blogspot.com
0 Response to "How Large Should The Heat Duct Register Be On 8 Flex Duct"
Post a Comment